Between work, kids, hockey, dance, homework, home projects, etc… time to work on the boat has been tough to come by. With the little time we do get, we try to actually use the boat but now that the weather has changed and a quick sail isn’t an option, it’s finally time to get busy. Priority number one is the compression post base, but I’m still undecided on exactly how I want to tackle it. The electrical system is next up, but it’s looking like that’s going to require a little more money than I’m willing to spend right now. So what’s next?…A functioning head door!
I’m not sure if I missed it during my first inspection, or it happened during one of our trips. Either way, there was a crack in the door where the bottom rail met the stile on the hinge side. The crack was open enough to wedge the door in the frame and make it difficult to open. Occasionally the door would get wedged tight enough to require a herculean feat of strength to pry it open (fantastic for keeping an argumentative kiddo who refuses to admit he needs to go the bathroom locked up, but not so inviting for guests). Luckily Ange has been working out and was willing (after an apology from the argumentative kiddo) to un-wedge the door.
After I got the door home it was time to assess the damage. 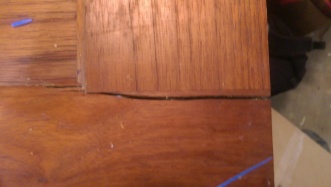 It looked like a simple fix a little glue and a clamp could easily fix. Unfortunately I learned the hard way glue doesn’t stick without cleaning the surface first and there was a little more stress pulling the crack apart than I thought. Now I was stuck with the same crack, but it was full of dried glue. 30 minutes of scraping the crack later, I cleaned the crack and moved on to plan B.
Plan B was to use a Kreg jig to drill pocket screws in to the crack. It sounded easy, but I don’t have good luck with the Kreg system and I was a little apprehensive to drill into the door. The Kreg jig is designed to drill the holes before you assemble the joint, but since I couldn’t pull the joint apart, I couldn’t use the preset offsets on the jig. All I could do was measure the offset and transfer it to the door. I measured about a dozen times, drilled half a dozen test holes in scrap wood, and downed a few beers before I was ready to drill.
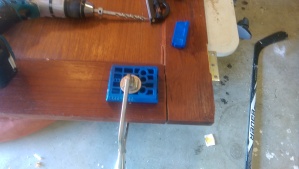
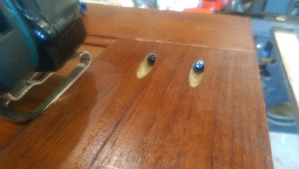
Luckily the Kreg kit worked out and the holes were straight and in the right place. One more time with the glue and clamps to line everything up and the door was fixed! All I had to do was install it.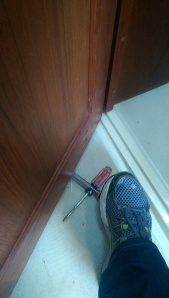
I’ve hung every door in my house (some twice) and helped a few friends with their projects so I didn’t worry about putting the head door back up. Obviously all that experience didn’t add up to much because I forgot how difficult it is to screw hinges still attached to the door into the frame without a helper. No matter what I tried, it always seemed like I was just one hand short until I remembered a trick I saw on This Old House or one of the other home improvement shows. A chisel over a screwdriver made a simple leaver I could use my foot to lift the door while I positioned and screwed the door into place.
We now have a functioning door to the head. All I need is a few matching plugs to fill the screw holes and a new excuse to put the compression base repair off a little longer.


